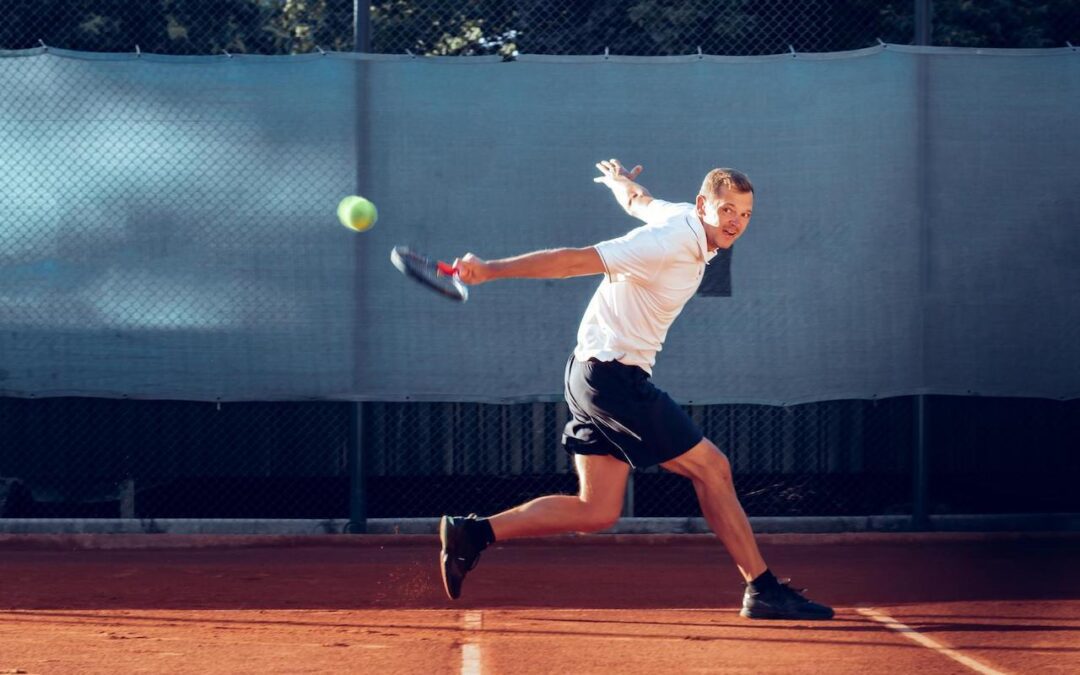
How to Hit a Perfect Half-Volley: A Step-by-Step Tennis Lesson

How to Hit a Perfect Half-Volley: A Step-by-Step Tennis Lesson


The Half-Volley Tennis Lesson: Techniques and Drills

Welcome to this comprehensive half-volley tennis lesson, where we will dive deep into one of tennis’s most challenging yet rewarding strokes.
Understanding the half-volley can significantly improve your game, whether you’re a beginner or an advanced player.
In this article, we will cover the essential techniques, grips, and drills to help you master this critical shot.

🎾 Intro to Half-Volley Tennis Lesson

The half-volley is a unique stroke that requires a combination of good anticipation, racket control, and balance. It is often encountered during match play, especially when transitioning from the baseline to the net.
In doubles, your opponents will frequently aim to hit the ball down at your feet, making the half-volley an essential skill to develop.
The goal of this lesson is to guide you step-by-step through the different aspects of the half-volley, including grip, preparation, contact, and follow-through.

🎾 Half-Volley: Grip & Preparation

The first step in executing a successful half-volley is mastering the grip. I highly recommend using the continental grip, often referred to as the hammer grip. To achieve this grip, position the V formed by your index and thumb on the edge of the racket and slide it down towards the bottom.
This grip allows you to have better control and makes it easier to react quickly to incoming shots.

As you approach the net and notice a ball coming toward your feet, transition into the continental grip.
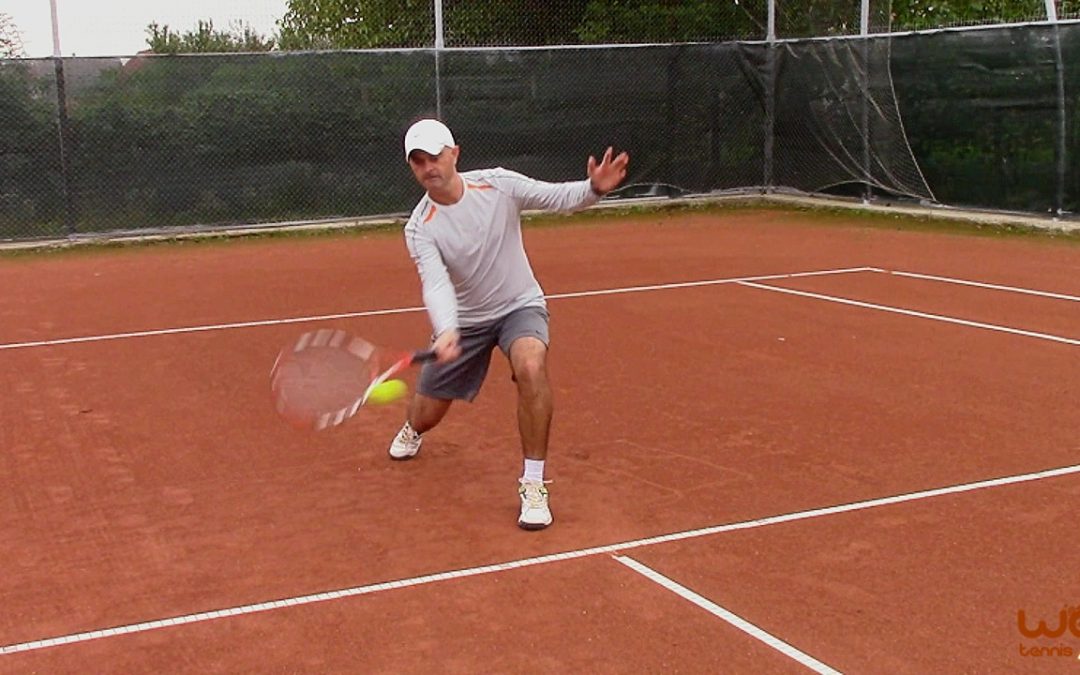
It’s crucial to never stand straight when preparing to hit a half-volley. Always bend your knees to lower your center of gravity. This position not only enhances stability but also enables you to get down to the ball more effectively.
Remember, your back should remain straight while you bend your knees!

When preparing to hit the ball, ensure that your racket is behind the path of the incoming shot, and avoid taking a backswing.
The half-volley is about quick reaction and finesse, not about power. So, as you get into position, keep your racket parallel to the ground, ready to make contact with the ball just after it bounces.

🎾 Half-Volley: The Contact

Contacting the ball during a half-volley is crucial for success.
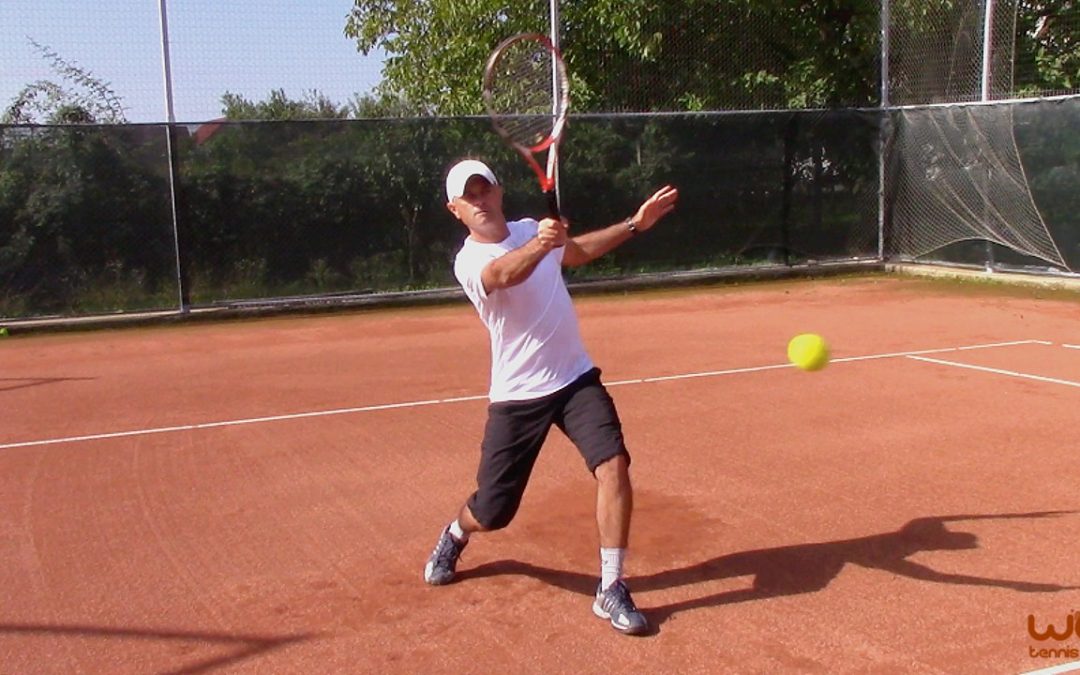
As you bend your knees and get into position, aim to make contact right after the ball bounces. Your racket should be positioned in front of you, with strings facing forward.
It’s important to maintain that 45-degree angle with your body towards the net post, ensuring that your racket doesn’t swing back behind your shoulders.

At the moment of contact, think of the half-volley as a push rather than a swing. You won’t generate much power from a backswing, so focus on using your legs to provide the necessary force.
As you push through the ball, transfer your weight forward. This technique not only helps in controlling the shot but also ensures that you maintain momentum after making contact.

🎾 Half-Volley: Finish/Follow-Through

The follow-through in a half-volley is shorter and more controlled than in other strokes. After making contact, continue directing your racket towards your target.
If you aim for a cross-court shot, your racket should finish pointing in that direction. For a down-the-line shot, adjust your follow-through accordingly.

Remember, the half-volley is not about elaborate follow-throughs; it’s about precision and placement.
As you practice, focus on guiding the ball rather than trying to hit it hard. The objective is to get the ball over the net and into the court while avoiding giving your opponents an easy opportunity to attack.

🎾 Half-Volley: Purpose in Singles and Doubles Play

Understanding the strategic use of the half-volley is vital for both singles and doubles play. In singles, the half-volley can be used to keep the ball straight ahead or to exploit openings. In doubles, the priority shifts to keeping the shot away from the opposing net player. Always remember to keep your shot low and controlled to minimize the chance of giving your opponents a high ball to attack.

In summary, the half-volley serves as a crucial transition shot. It’s essential to keep moving forward after hitting the ball, maintaining pressure on your opponents, and positioning yourself for the next shot.
The half-volley is not just a defensive move; it can also be an offensive weapon when executed correctly.

🎾 Half-Volley: Progression Drills

Now that you have a solid understanding of the half-volley, let’s dive into some effective drills to practice this skill. Start with a few basic drills to build your confidence and consistency:

  • Solo Bounce Drill: Begin by holding the racket with the continental grip. Bounce a ball in front of you and, as it drops, bend your knees and catch the ball right as it comes up off the ground. Focus on getting the racket behind the ball without a backswing, and push through the ball using your legs.
  • Partner Feeding Drill: Position yourself at the service line or behind it while a partner feeds you balls. Ensure that you turn your body slightly sideways at a 45-degree angle. As the ball approaches, bend your knees and push through the ball right after it bounces.
  • Ball Machine Drill: If you have access to a ball machine, set it to feed balls just inside the service line. Practice your half-volley technique by focusing on timing, footwork, and pushing through the ball. This drill simulates match conditions and allows you to work on your placement.
  • Placement Drills: As you become more comfortable with the half-volley, practice targeting specific areas of the court. Aim for cross-court shots and down-the-line shots, ensuring that your racket follows the direction of your target.

These drills will help you develop the timing, footwork, and control necessary for executing effective half-volleys during matches.
Remember to have fun with your practice and be creative with your drills!

half-volley tennis technique lesson

FAQ

What is a half-volley in tennis?

A half-volley is a shot executed just after the ball bounces, requiring quick reflexes and precise control. It is often used when transitioning from the baseline to the net.

Why is the continental grip important for half-volleys?

The continental grip allows for better control and quick adjustments when responding to low balls, making it an ideal choice for executing half-volleys.

How can I improve my half-volley technique?

Practice drills that focus on timing, footwork, and the push-through technique. Consistent practice with a partner or ball machine will enhance your skills.

Is the half-volley an offensive or defensive shot?

The half-volley can be both! While it is often used as a defensive shot to handle low balls, it can also be strategically placed to create offensive opportunities against your opponents.

In conclusion, mastering the half-volley is essential for any tennis player looking to elevate their game. By focusing on the grip, preparation, contact, and follow-through, you can develop a reliable half-volley that will serve you well in matches.

For more in-depth training and tips, check out Cosmin’s Tennis Training.

 

Cosmin Miholca

Cosmin Miholca

Certified Tennis Coach

Ready to improve your tennis further?
Let’s get started!

No Backswing, No Problem: The Drill to Fix Your Tennis Volley!

No Backswing, No Problem: The Drill to Fix Your Tennis Volley!


How to Teach the No-Backswing Tennis Volley

The no-backswing tennis volley lesson is a game-changer for beginning and intermediate players. Players can make early contact with the ball by keeping the racket in front of their shoulders, resulting in cleaner and more consistent volleys.
This blog post will delve into the essential drills and techniques to help you learn this important skill.

Table of Contents

Introduction to “No-Backswing Tennis Volley”

I emphasize the importance of avoiding a backswing when teaching the volley, especially to beginners.
The entire volley stroke should happen in front of the player’s shoulder, whether they are hitting a forehand or backhand.
Keeping the racket from going behind the line of their shoulders is crucial for developing proper technique.
This approach helps players make better contact with the ball and improves their overall consistency.

Fence Drill Description

To help players grasp the concept of the no-backswing volley, I use a simple drill where they stand with their backs against a fence (watch the video above for more details). This drill reinforces the idea that the racket should not touch the back fence during the stroke.
Here’s how it works:

  • Players start in a ready position with their backs against the fence.
  • They practice volleying, ensuring that their racket does not touch the back fence.
  • The focus is on keeping everything in front of their shoulders while stepping into the ball.

As they practice this drill, I remind them to think of the volley as a push rather than a punch. This helps them understand the importance of maintaining a stable racket head and controlling their shot.

Fence Drill Practice

Once players understand the drill, it’s time to practice. I often set up my two daughters, Bianca and Cezara, to demonstrate. They stand with their backs against the fence, ready to volley.
First, I guide them through a series of forehand and backhand shadow volleys, emphasizing the importance of not hitting the fence behind them.

During practice, I encourage them to:

  • Set up in the ready position.
  • Step into the ball with their racket heads up.
  • Maintain their racket in front of their shoulders.

For instance, when they practice their forehand volley, I might say, “Get ready, Bianca. Set, push!” This straightforward instruction helps them focus on the action without overthinking the mechanics.
As they practice, I remind them that the goal is to keep their racket head stable and avoid bringing it too far back.

Practice at the Net / No-Backswing Tennis Volley

After the fence drill, it’s time to move to the net.
I remind my daughters to visualize the fence still behind them as they continue practicing their volleys. The key is to ensure that everything happens in front of their shoulders.
I guide them through a series of forehand and backhand volleys, emphasizing the same principles from the fence drill.

In this setting, I instruct them to:

  • Get set and push the ball with their racket.
  • Maintain a stable racket head without swinging back.
  • Focus on making early contact with the ball.

As they volley, I encourage them to think about the push rather than a swing. I often say, “Imagine you still have the fence behind you. Everything happens in front!” This mental cue helps them stay consistent and focused on their technique.

Final Tips

As with any tennis skill, mastering the no-backswing volley takes time and practice. Here are some final tips to help you improve your technique:

  • Stay Relaxed: Tension can lead to mistakes. Keep your grip relaxed to allow for better racket control.
  • Focus on Timing: Early contact is key. Anticipate the ball’s arrival and position yourself accordingly.
  • Keep Practicing: Consistency comes with repetition. Regular practice will help solidify your technique.

Remember, the goal is to keep everything happening in front of your shoulders, which will not only improve your volleys but also enhance your overall game.

no-backswing tennis volley / coaching lesson

F.A.Q.

What is a no-backswing volley?

A no-backswing volley is a technique where the player keeps the racket in front of their shoulders, avoiding any significant backswing. This approach allows for quicker and more controlled volleys.

Why is it important to avoid a backswing?

Avoiding a backswing helps players make early contact with the ball, resulting in more consistent and accurate volleys. It also reduces the risk of mishitting the ball.

How can I practice the no-backswing volley?

Start with the fence drill, where you practice volleying with your back against a fence. Then, transition to practicing at the net, keeping the same principles in mind.

Can beginners use this technique?

Absolutely! The no-backswing volley technique is beneficial for players of all levels, including beginners. It helps establish a solid foundation for effective volleying.

Are there any drills to improve my volleying skills?

Yes! In addition to the fence drill, practicing with a partner at the net, focusing on keeping your racket in front, is an excellent way to improve your volleying skills.

For more tennis drills and lessons, feel free to check out Cosmin’s Tennis Training for valuable resources and tips.


Cosmin Miholca

Cosmin Miholca

Certified Tennis Coach

Ready to improve your tennis further?
Let’s get started!

Fix Your Contact Point with These 2 Tennis Drills

Fix Your Contact Point with These 2 Tennis Drills


Contact Point Tennis Drills

When it comes to improving your tennis game, focusing on the contact point is crucial.
It’s the moment where your racket meets the ball, and mastering this can significantly enhance your shot execution.

In this blog post, we’ll explore effective contact point tennis drills designed to help you or your students achieve better timing and consistency on the court. Let’s dive in!

Table of Contents

Intro to “Contact Point Tennis Drills”

One of the common challenges coaches face when teaching beginner players is the inconsistency of their contact point.
Players often hit the ball either too far in front or too far back, leading to poor shot execution. Understanding where the racket and ball should meet is essential for developing a solid foundation in tennis.
This post will cover two key drills that can help players learn to establish a consistent contact point.

Drill #1: Catch the Ball Out in Front

The first drill is simple yet effective. It helps players understand where the contact point should be by catching the ball out in front of their body.

  • Step 1: Begin by positioning your student at the service line, facing sideways as if preparing for a forehand.
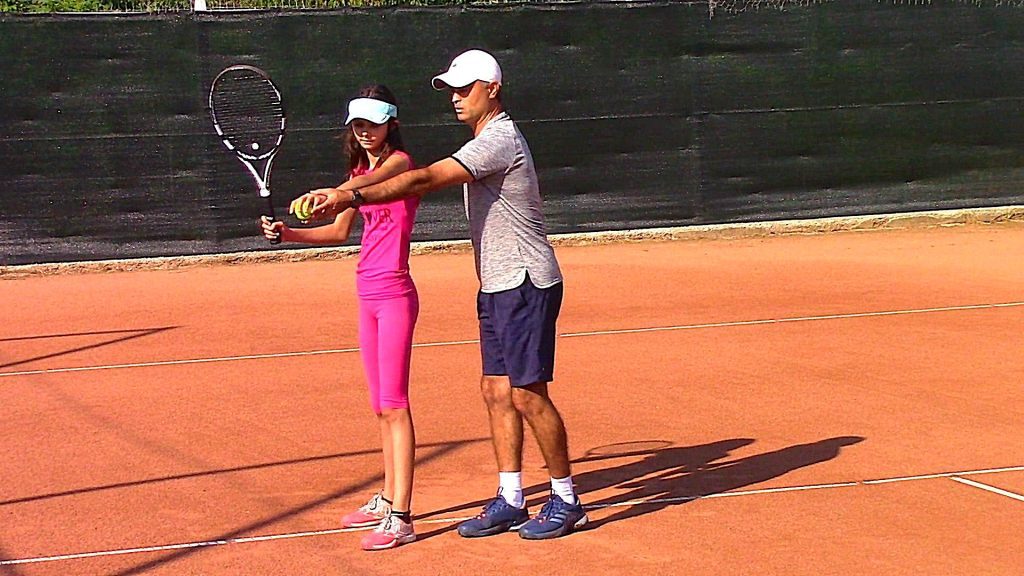
  • Step 2: Toss a ball to your student, instructing them to catch it with their non-dominant hand after it bounces. This helps them recognize the ideal contact point.
  • Step 3: Once they catch the ball, ask them to freeze in that position. This moment of pause allows them to visualize where the ball should meet the racket.
  • Step 4: After freezing, instruct them to drop the ball and take a forehand swing. They should aim to make contact in the same position where they caught the ball.

This drill reinforces the concept that the ball should be contacted out in front of the body, not too close or too far away.
Encourage your student to repeat this process multiple times to build muscle memory.

Drill #2: Contact and Follow-Through

The second drill focuses on establishing the correct racket position at the point of contact and emphasizing the follow-through.

  • Step 1: Have your student stand with their racket in the position they would use to make contact with the ball. This position should mirror where they caught the ball in the previous drill.
  • Step 2: Toss the ball to them again, instructing them to push through the ball and follow through without taking the racket back. This reinforces the importance of the contact point.
  • Step 3: Encourage them to push and follow through with acceleration, focusing on a long finish.
  • Step 4: Repeat the process several times, ensuring they maintain the correct contact point each time.

This drill emphasizes the importance of contact and follow-through without complicating the swing mechanics. It allows players to focus solely on where the racket meets the ball.

Practice the Optimal Point of Contact

After practicing the first two drills, it’s time to incorporate full swings into the training.
By now, your student should have a better understanding of the optimal contact point.
Here’s how you can proceed:

  • Step 1: Have your student get into their ready position and prepare for a full forehand swing.
  • Step 2: Feed them balls at varying speeds and heights, encouraging them to focus on making contact at the optimal point.
  • Step 3: If they struggle with timing or contact point, revert to the previous drills to reinforce the concepts.

It’s essential to keep the drills engaging and progressive. As players become more comfortable with their contact point, they can begin to experiment with different shots and spins.

tennis coaching / contact point fix

Frequently Asked Questions (FAQ)

Why is the contact point important in tennis?

The contact point is crucial because it determines the quality of your shot. Hitting the ball at the optimal point allows for better control, power, and accuracy.

How can I improve my contact point consistency?

Practicing drills that emphasize catching and making contact with the ball out in front can help. Repetition is key to developing muscle memory and consistency.

What should I do if I’m still struggling with my contact point?

If you continue to struggle, revisit the basic drills. Consider working with a coach for personalized feedback and adjustments to your technique.

Are these drills suitable for all skill levels?

Yes! These drills can be adapted for beginners and intermediate players. The key is to focus on the fundamentals and gradually introduce complexity as players improve.

Where can I find more resources on tennis drills?

For additional tennis drills and tips, you can check out resources like the Ultimate Tennis Practice for 2 Players.

By focusing on the contact point through these drills, you’ll be well on your way to improving your game. Remember, consistency comes with practice, so keep hitting the courts! Happy training!


Cosmin Miholca

Cosmin Miholca

Certified Tennis Coach

Ready to improve your tennis further?
Let’s get started!

How to Teach (Or Learn) the Proper Distance to the Ball

How to Teach (Or Learn) the Proper Distance to the Ball

The proper ball distance appears to be an ardent subject that tennis coaches want to know when teaching beginning players.

Some young players (beginners) indeed have difficulty achieving optimal contact with the ball – getting either too close or too far from it. Therefore, coaches try to find solutions to help their players hit the ball more naturally and in balance.

Unfortunately, there is no quick or easy solution to this and, if you ask me, I consider this will be fixed naturally through repetition. The only way a beginning player realizes to “feel” the optimal contact point and space to the ball is through lots of practice. Eventually, the player will develop the proper timing, hand-eye coordination, and footwork to position the body and racquet most comfortably and naturally.

But if you really want to speed up the process, I dare to suggest a couple of drills that you and your student can do to get a clear understanding of where the contact with the ball should be and improve the timing to achieve that:

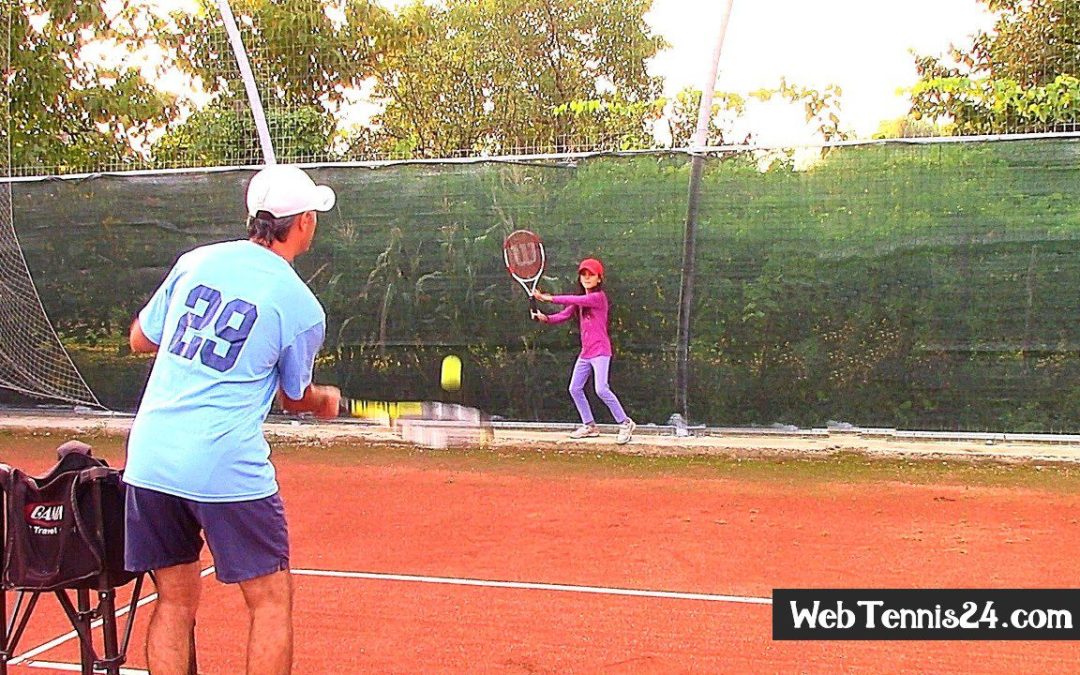
1. Have your student (or partner) position in an open stance (feet parallel to the net) or square stance (feet sideways to the net) and racquet held at a “contact point” position: racquet face towards the net, proper grip, arm slightly bent. By the way, this can be applied when practicing either forehand or backhand groundstrokes.
From the “contact point” position, hand-feed a few balls toward the player’s racquet. After the ball bounce, the player should push the ball and swing from that point on, and follow through.
Practice contact and follow-through without a backswing.
This drill will teach the player where the contact with the ball should be (spacing and body position). Eventually, they will register that. With proper timing and footwork developed through repetition, this will become a habit.

2. Repeat the previous drill with a slight adjustment: instead of tossing balls for your student, you will rally with them this time. Your student will begin every stroke from the contact point position (no backswing) while pushing and following through after each contact.
Again, this will teach the player proper spacing to the ball.
One important tip is to rally with your student from the service line or just behind it in order to avoid a bigger swing and take the racquet back.
You can even use foam or any light junior tennis balls to keep things simple in the beginning.

Try these two drills and let me know if your student develops and gets a better feel for spacing to the ball.

One more tip: do not over-emphasize other technical aspects such as footwork or body position. To get the contact and timing right, allow the student to focus only on the ball; let the other elements happen naturally… for now.

Additional Note:
For players who want to learn the above technique by themselves, I recommend either using a ball machine or asking a tennis partner to feed (by hand) some balls to them.

Related Content: Strokes Progressions Lessons – learn tennis without a partner or coach

Cosmin Miholca

Cosmin Miholca

Certified Tennis Coach

Check out my work at WebTennis24 where I share with you my best video tennis lessons, drills and tips for players, coaches and tennis parents.

6 Ways to Use the SLICE Groundstroke to Your Advantage

6 Ways to Use the SLICE Groundstroke to Your Advantage

In today’s game, dominating and finishing points with aggressive topspin groundstrokes is the norm for most tennis players. However, I would like to emphasize the many advantages of practicing slice (underspin) groundstrokes and using them more often in your matches.

Here are six reasons why you should add slice spin to your repertoire:

1. Slice groundstrokes keep the ball low to the ground, making it difficult for your opponent to attack you with an aggressive shot. This is especially effective when playing against players who have a big topspin forehand or backhand. 

2. Slice approaches keep you away from receiving balls down at your feet. This is because your opponent will be forced to hit up on the ball, which will give you more time to react and hit a good ‘high’ volley.

3. Slice groundstrokes are great for doubles play. When playing against a team that loves to lob, a slice approach will make it almost impossible for them to send the ball high over your head.

4. Slice groundstrokes add variety to your shots. Mixing up your shots with slice and topspin will help to disrupt your opponent’s timing and make it more difficult for them to read your next shot.

5. Slice groundstrokes can give you time to recover when you are pushed wide by an aggressively angled groundstroke or serve. The slower pace of the slice will give you more time to get back into position and be in balance for the next shot.

6. Slice spin is essential for hitting drop shots. The backspin on a slice shot will cause the ball to drop quickly and sharply, making it difficult for your opponent to reach.

Quick Technique Tip:
When executing a slice groundstroke, remember to begin the downward motion with the racquet high above the point of contact. This will help you to generate more underspin and keep the ball low to the ground.

Practice slice groundstrokes as often as possible. There will be times in the match when you will need them.

Cosmin Miholca

Cosmin Miholca

Certified Tennis Coach

Check out my work at WebTennis24 where I share with you my best video tennis lessons, drills and tips for players, coaches and tennis parents.

Knuckles Up!

Knuckles Up!

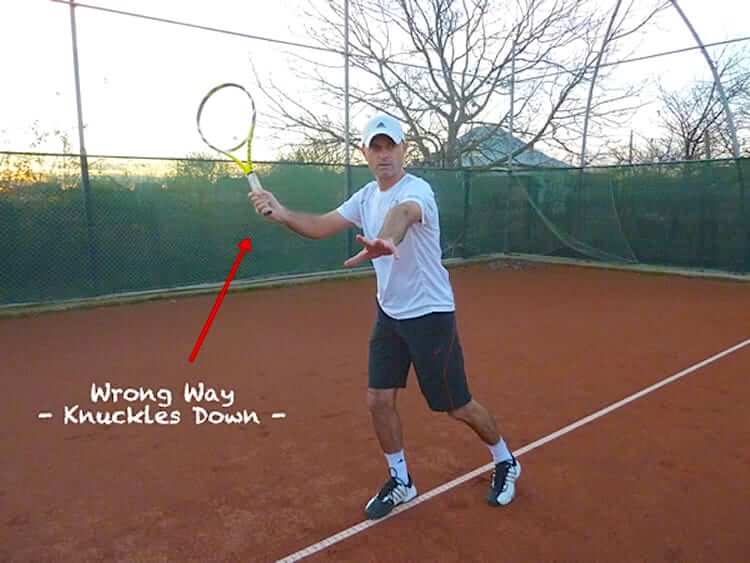
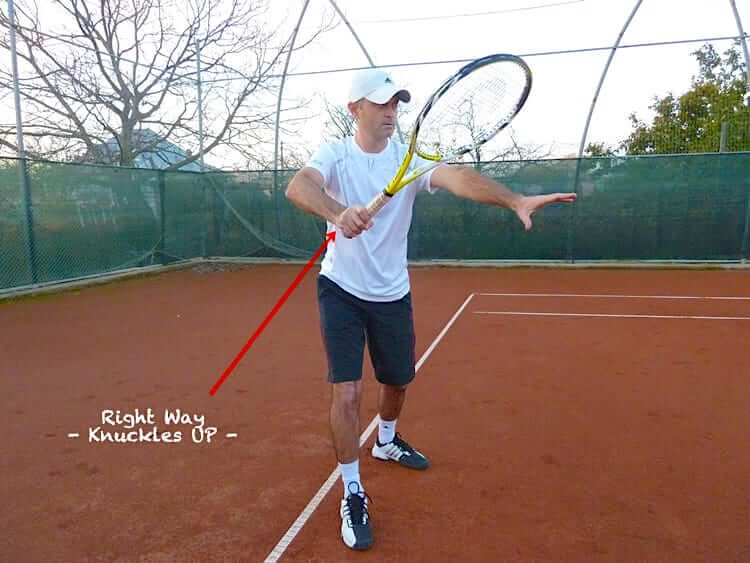
One way you can create more topspin on groundstrokes and more power on your serves or overheads is to prepare for the stroke (take the racquet back) with your dominant palm (that holds the racquet) facing down; or, as I like to call it to my students: “knuckles up!”
I do not, by any means, imply that this is the key to creating topspin or power on those strokes. It just helps.

Often, beginning players have a tendency to open the racquet face on the forehand ground-stroke (palm forward or up) backswing. That results in flat strokes or slice, and when they swing low to high the ball sails too deep.

Below you see two pictures – the wrong and the right way of taking the racquet back on the forehand groundstroke.

knuckles up in tennis

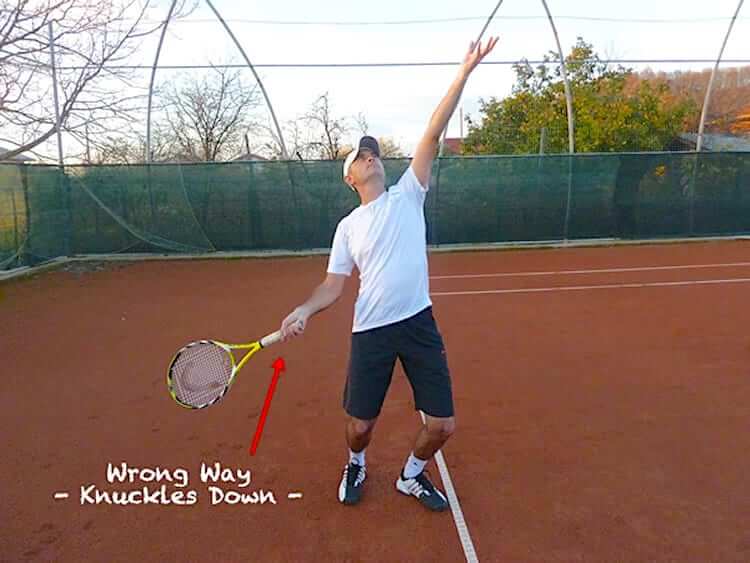
The same happens on the serve racquet take-back (regardless of your grip) – when the palm is facing up or to the side (see picture below), the wrist is stretched and that slows down your pronating action (at contact) very necessary to create power and spin.

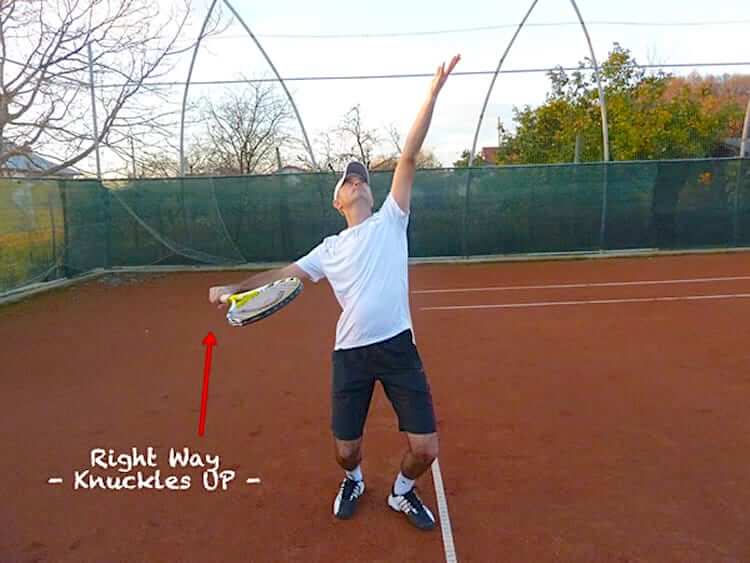
The right way for you to take the racquet back when preparing for the serve would be to have your palm facing down (knuckles up) – see the picture below:

knuckles up in tennis

Learn tennis techniques with crystal-clear explanations and visual aids. Join Visual Tennis Lessons program and simplify your learning journey!

Cosmin Miholca

Cosmin Miholca

Certified Tennis Coach

Check out my work at WebTennis24 where I share with you my best video tennis lessons, drills and tips for players, coaches and tennis parents.

You vs Talent

You vs Talent

A couple of months ago I finished reading Nadal’s book, Rafa, and there was one statement he made that I have been thinking about ever since… He said that his sister and the rest of the family consider him as being far from coordinated and a terrible driver. Nadal, himself, admits that the only reason we see him move so well on the court is because he has been spending so much time doing these movements that they just became natural and easy.

This brings me to a subject I have always found fascinating – tennis talent. 

Is there really talent that some people are born with?

or

Is talent a skill that we develop through meticulous repetition?

As I was growing up, I thought my brother had a talent for sports: he was faster and more coordinated than me. My father wanted to prove me wrong and showed me that hard work can triumph over talent. As a result, I overcame my brother’s talent in the last tournament we played when we met in the final: I won due to the extra hours my father and I put in just to prove this theory. 

Years later, I had the fortune to read two great books, Bounce (by Matthew Syed) and The Talent Code: Greatness Isn’t Born. It’s Grown. Here’s How (by Daniel Coyle), which explains in detail and with concrete examples that talent is not something we are born with; instead it is something that we develop through thousands of hours of specific repetition. 

That opened my eyes to the fact that all these geniuses we admire, in fact, were not born with talent. All of them have been very early practitioners in the field they eventually excelled in.

Take Nadal for example; he began tennis at the age of three under the supervision of his uncle Toni.
Mozart (in music), another genius, was actually introduced to music by his father (an experienced music teacher and composer) at a very early age of one.
Tiger Woods, introduced to golf by his father before the age of two, is another example of what we call genius.

All these people and many others that we look up to have excelled in their field not because they were “gifted” but because they have started their career at very early ages.

Researchers came up with a statistic that in order to achieve excellence in anything you must do two things:
1. begin practicing at a very early age,
2. spend over 10,000 hours / 10 years of specific practice in order to master it.

I personally agree with this research but as a parent of two girls I cannot help but notice that there are differences that people are born with: my younger daughter seems to be catching up with many things a lot easier as long as they are physical activities while my older daughter loves and excels in mental tasks: reading, math, etc.

I agree that we are born with a certain conformation in which our nervous system functions, but ultimately the talent is the result of one main process: specific repetition.

That being said, I believe that repetition can take us places that we don’t even see ourselves capable of.

Just like one of my fellow teaching pros once said to his student: “Ok, Mary, this is how you hit a one-handed backhand. From now on, all you have to do is repeat this 3,000 times and you’ll have a great backhand!”

Cosmin Miholca

Cosmin Miholca

Certified Tennis Coach

Check out my work at WebTennis24 where I share with you my best video tennis lessons, drills and tips for players, coaches and tennis parents.