One-Handed Backhand Tennis Lesson: How to Build the Shot Alone With a Ball Machine
If you want a one-handed backhand tennis lesson you can actually use on your own, the key is to build the stroke in the right order. Not speed first. Not power first. And definitely not from the baseline right away. Start with the simplest piece of the shot, repeat it until it feels clean, then add the next layer.
That is exactly how I like to teach the one-handed backhand when you are practicing solo with a ball machine. Done properly, this shot feels smooth, natural, and surprisingly effortless. But it also asks for better timing and cleaner control than a two-handed backhand, especially at contact.
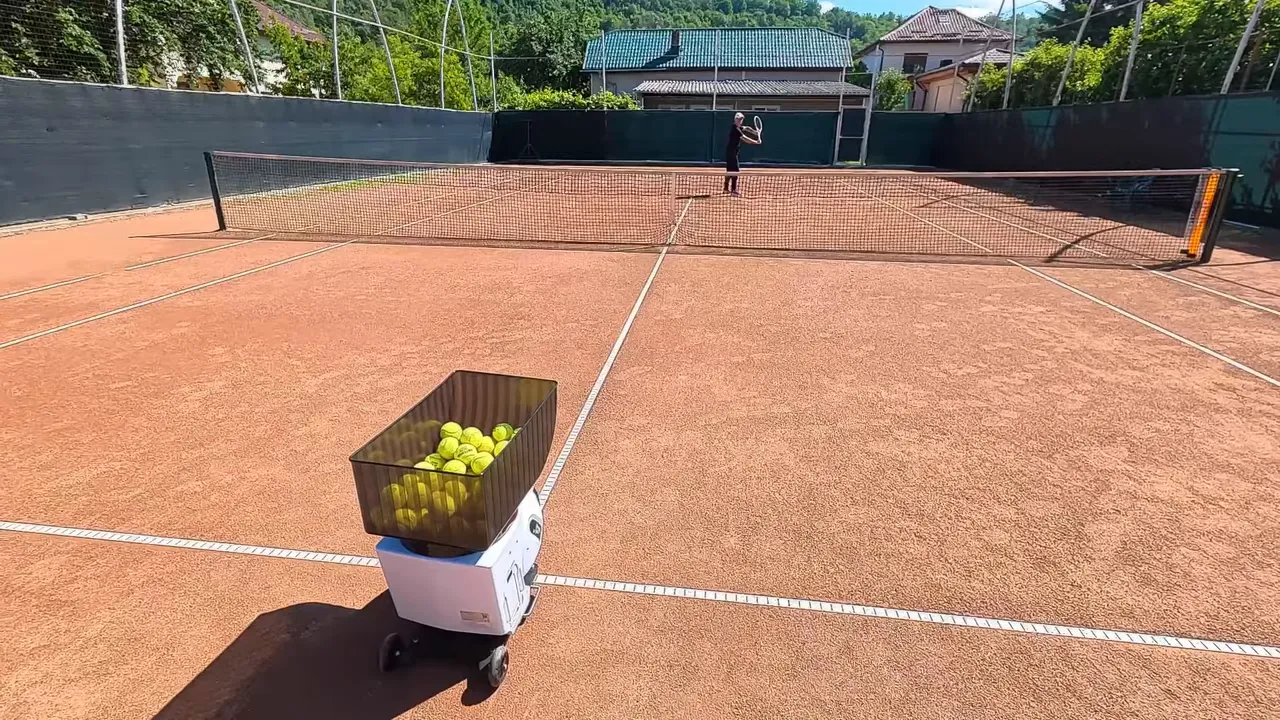
The good news is that solo practice can work extremely well here. A ball machine gives you a steady feed, a predictable rhythm, and enough repetition to learn the movement without interruption.
Why the one-handed backhand needs a different approach
The one-handed backhand is not just a two-handed backhand with one hand removed. The contact point is farther in front of the body, and the swing has a freer, longer release through the ball.
That means two things matter right away:
- Early preparation
- A clean contact point out in front
If you miss either one, the stroke usually feels late, cramped, or unstable. If you get both right, the shot starts to flow.
If you are still deciding which backhand style suits your game, this comparison of one-handed vs two-handed backhand can help you sort out the tradeoffs.
Start at the service line, not the baseline
This is one of the biggest mistakes players make in any one-handed backhand tennis lesson. They begin too far back.
Start at the service line. From there, the ball reaches you more slowly, which gives you more time to organize your body, find the contact point, and finish in balance. You are learning the stroke, not testing it under pressure.
Set the ball machine on the opposite service line so the feed is gentle and controlled. If your machine has a remote, even better. It saves time and keeps your rhythm going. I also like having at least 100 balls loaded for a productive session. That amount of repetition matters.
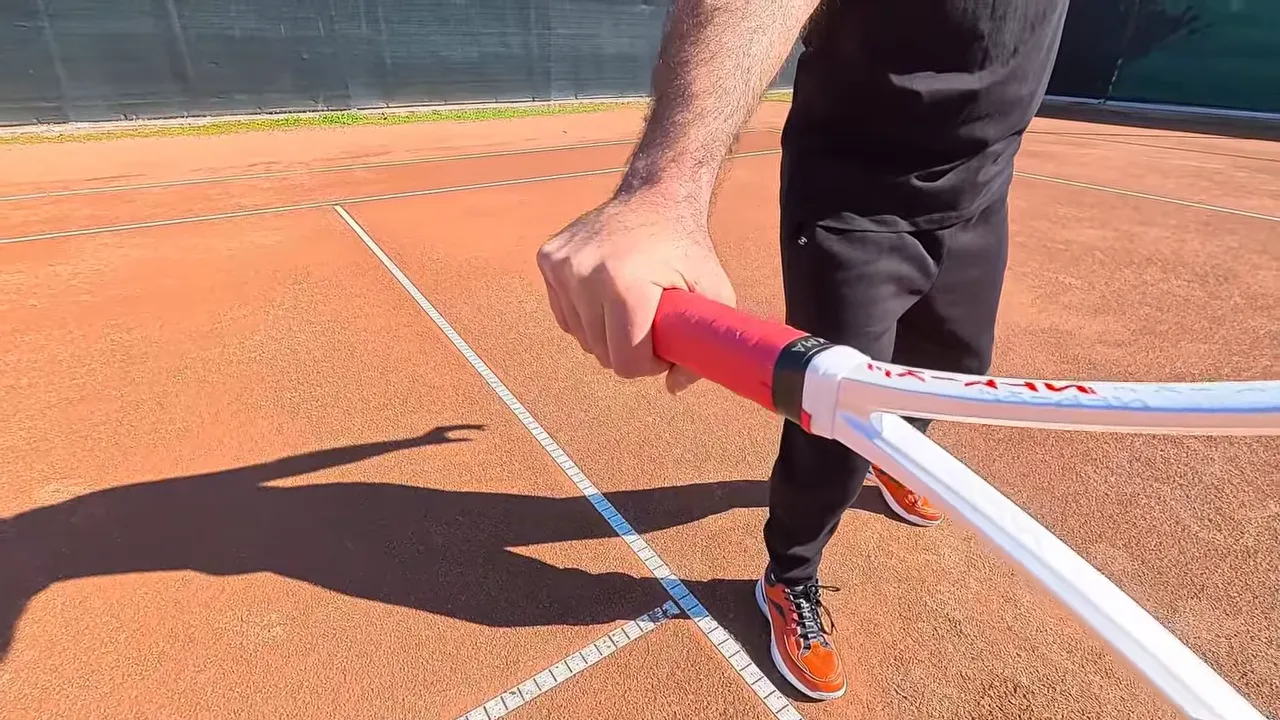
Use the eastern backhand grip
For this one-handed backhand tennis lesson, use an eastern backhand grip.
An easy way to find it is to hold the racket edge straight up, identify the top bevel, then move your hand one bevel over to the backhand side. For a right-handed player, that places the palm on the bevel eight. At first, it may feel unusual. That is normal.
The important thing is not just where the hand sits, but what the grip allows you to do. It helps you present the strings correctly at contact and drive through the ball with a stable hitting arm.
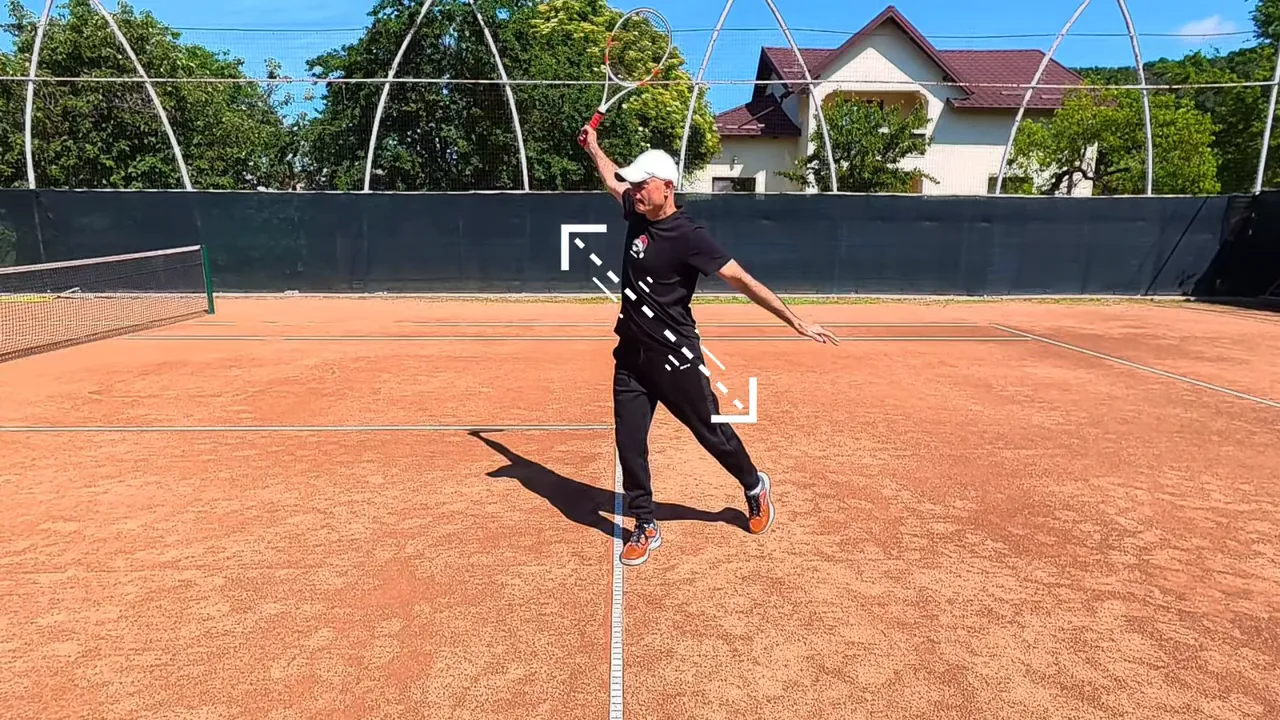
Step 1: Learn the contact point and follow-through first
This is the foundation of the whole stroke.
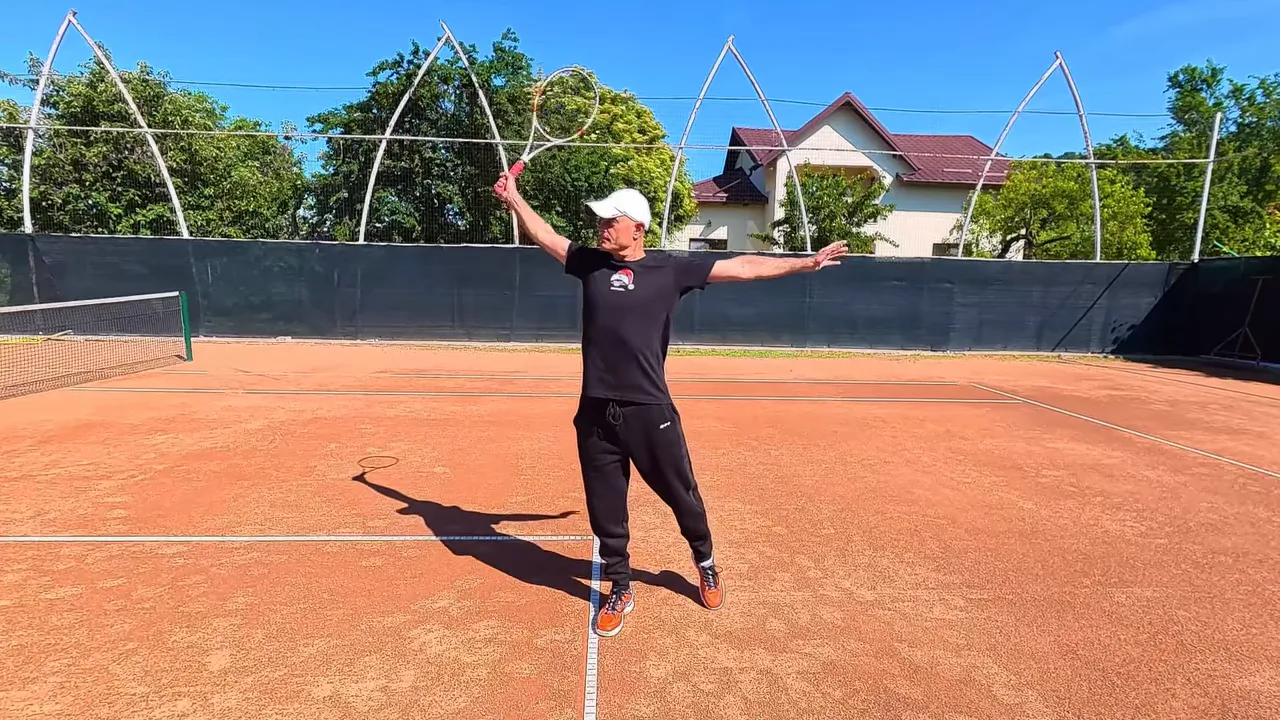
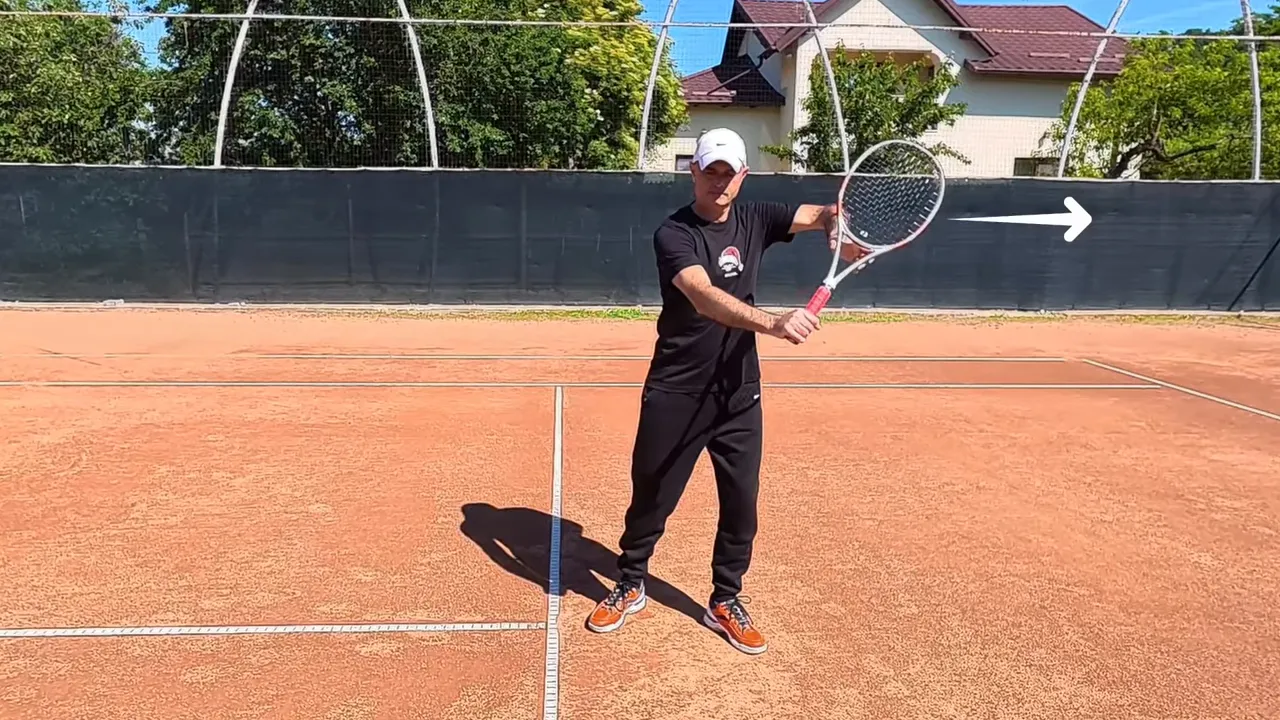
Stand at the service line with your body turned sideways. Extend your hitting arm with the racket roughly parallel to the ground and the strings facing forward. The contact should be above and in front of your front foot.
Now let the machine feed a soft ball. As the ball rises after the bounce, meet it from that contact position and simply push through it, then let the racket travel upward.
The finish should feel open and balanced. Your chest opens, the racket tip rises, and the two arms separate naturally. I often describe it like both arms moving away from each other. That shape helps players avoid collapsing the stroke.
Stay with this stage until the hit feels clean. No rush. If contact is messy, adding a backswing only adds more moving parts.
If contact has been a recurring issue in your game, these contact point drills can help reinforce the same idea.
Step 2: Add the preparation and backswing
Once contact starts to feel reliable, add the backswing.
Begin with the eastern backhand grip and support the racket throat with the non-dominant hand. Turn your shoulders so your body is sideways. From there, lift the non-dominant elbow so it points back, while the racket tip angles up and behind you at about 45 degrees.
Then let the hands drop naturally. Just below waist level, release the racket with the non-dominant hand and swing forward into the same contact and finish you already practiced.
The order matters:
- Prepare early
- Set the racket up
- Drop naturally
- Release the non-dominant hand
- Swing through contact
Do shadow swings before you hit balls. When the motion feels smooth without the ball, the machine can reinforce the pattern instead of exposing confusion.
Step 3: Build the full stroke from the ready position
Now the stroke starts to look real.
Begin in a neutral ready position with a forehand grip and your non-dominant hand on the racket throat. Then combine three actions at once:
- Step out with the non-dominant foot
- Turn the shoulders
- Change from forehand grip to eastern backhand using the non-dominant hand
That sequence takes you right into your preparation position. From there, step into the ball with the dominant foot, swing through contact, and finish tall and balanced.
I strongly recommend shadowing this phase a few times before hitting. Then program the machine for a short set, around 10 balls, with enough time between feeds to check your technique after each swing. A 5 to 7 second gap between balls works well, followed by a longer rest period.
That slower rhythm is useful because it keeps your session technical, not mindless.
|
Step 4: Add the footwork sequence
A solid one-handed backhand tennis lesson is never just about the racket. The feet create the timing.
Here is the full sequence:
- Start from a balanced ready position.
- As the ball leaves the machine, make a small split step.
- Step out with the non-dominant foot and turn sideways.
- Prepare the racket early.
- Move to the ball.
- Just before contact, step in with the dominant foot.
- Swing and finish in balance.
- Push off the dominant foot to recover.
- Use a crossover step and shuffle back to the starting position.
Practice that sequence without the ball first. If the movement is not organized, the stroke will always feel rushed. Once the pattern is smooth, feed balls and keep the same rhythm.
If you often feel late or jammed on the backhand side, this article on avoiding late contact off the back foot fits perfectly with this stage of practice.
Progress back gradually
Only move back when the stroke holds up from your current spot.
The progression is simple:
- Start at the service line
- Move halfway between the service line and baseline
- Then move all the way back to the baseline.
Each move back increases the challenge. The ball comes faster, the spacing gets tougher, and the footwork has to improve. If consistency drops too much, step in again and rebuild.
This gradual progression is what turns a practice stroke into a dependable match stroke.
Once the basics are stable, train direction and variety
After you can repeat the stroke comfortably, start aiming with purpose.
First, work crosscourt. That target is more natural and gives you more margin. After that, begin practicing down the line. Then make the machine feed to different depths and slightly different sides, so you have to adjust with your feet.
That is how you move from an isolated technique to a backhand you can trust under real conditions.
Keep the session simple and repeatable
The one-handed backhand rewards patience. Repetition matters, but only when you are repeating the right pieces.
What I like most about this kind of solo training is how clear it is. You do not need a complicated plan. You need a simple sequence you can repeat:
- Grip
- Contact point
- Backswing and preparation
- Ready position
- Footwork
- Progression backward
- Placement and variety
That is the structure of a solid one-handed backhand tennis lesson. Learn one layer, own it, then add the next.
FAQ
Can I really learn a one-handed backhand alone?
Yes, especially if you use a ball machine or another reliable feed. Solo practice works well because you can repeat the same ball and focus on one technical piece at a time.
Why should I start at the service line?
Starting at the service line slows the drill down. You get more time to prepare, find the contact point, and finish in balance without feeling rushed.
What grip should I use in a one-handed backhand tennis lesson?
The recommended grip here is the eastern backhand grip. It helps position the strings correctly and supports cleaner contact in front of the body.
What should I learn first, the backswing or the contact point?
Learn the contact point first. If contact is not stable, the rest of the stroke becomes harder to control. Build the shot from contact and follow-through, then add the preparation.
When should I move back to the baseline?
Move back only when you can repeat the stroke consistently from the service line. Then progress halfway back before going all the way to the baseline.
How many balls should I use in one session?
A session becomes much more productive when you have a large basket. Around 100 balls is a very practical minimum for this kind of technical solo training.
0 Comments